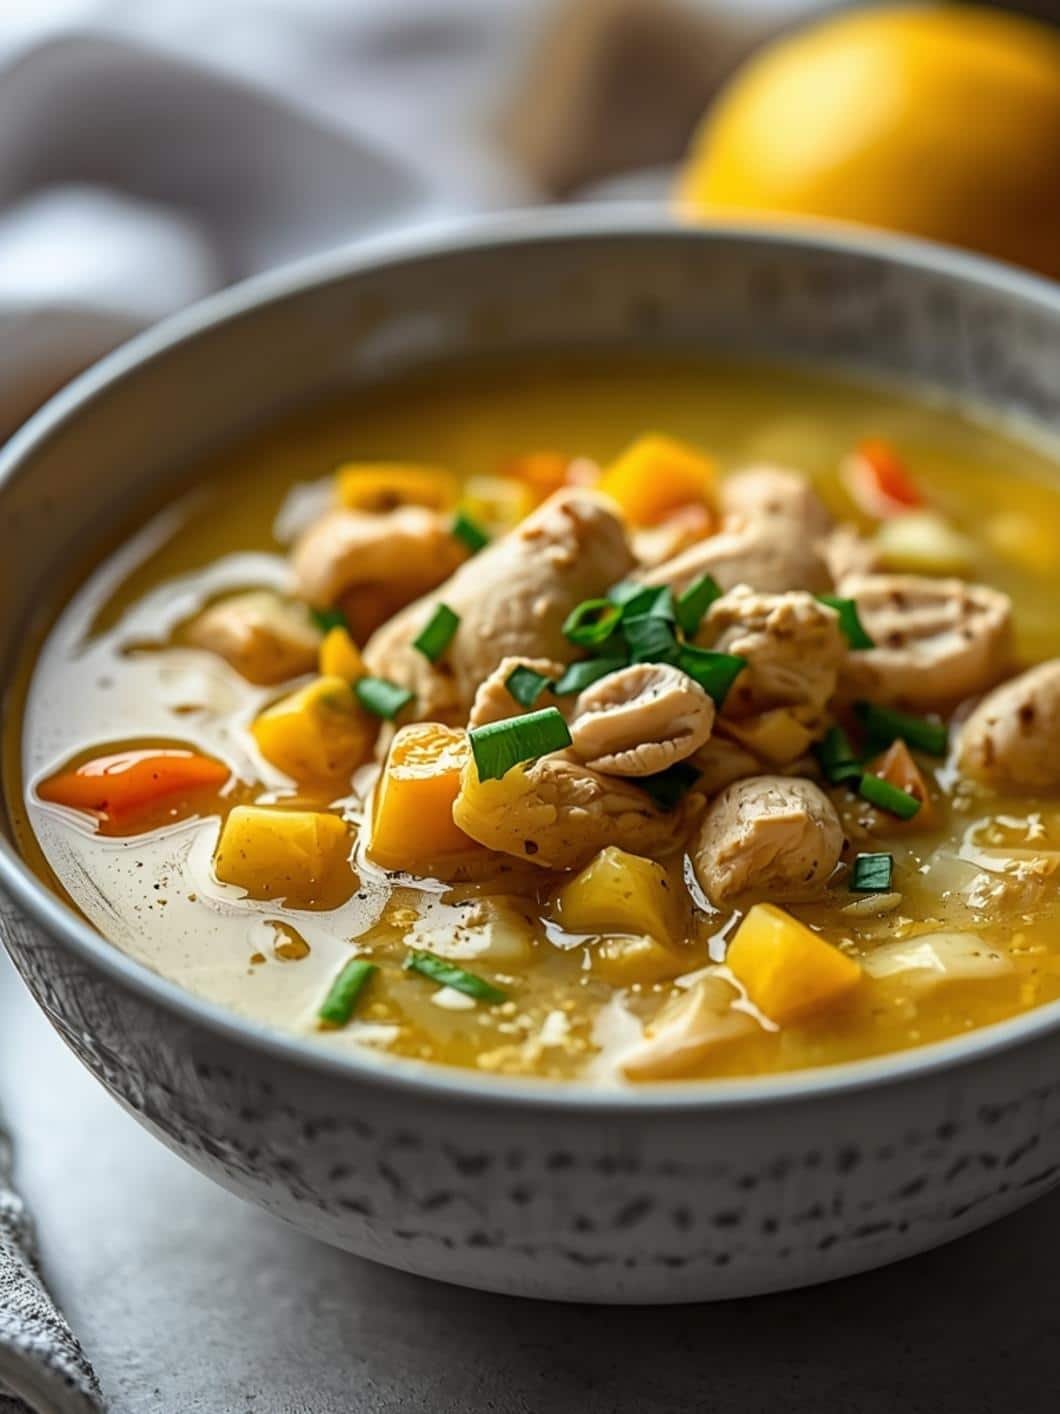
Whip up these flavorful Instant Pot BBQ Chicken Sliders for a quick and easy weeknight meal that the whole family will love. This pressure cooker barbecue chicken recipe is perfect for busy evenings and makes a great staple meal.

Discover how simple it is to get a delicious, satisfying dinner on the table with minimal fuss. These sliders are not only incredibly tasty but also incredibly versatile, making them a fantastic addition to your regular meal rotation.
Table of Contents
- What You’ll Love About This Quick And Easy Recipe
- Everything You Need To Make This Recipe Without Stress
- Time Needed From Start To Finish
- How To Make It Step By Step With Visual Cues
- Easy Variations And Serving Ideas That Fit Real Life
- Common Slip-Ups And How To Avoid Them
- How To Store It And Make It Ahead Without Ruining Texture

Instant Pot BBQ Chicken Sliders
- Total Time: 30-35 minutes
- Yield: 12 sliders 1x
Description
Whip up these flavorful Instant Pot BBQ Chicken Sliders for a quick and easy weeknight meal that the whole family will love. This pressure cooker barbecue chicken recipe is perfect for busy evenings and makes a great staple meal. Discover how simple it is to get a delicious, satisfying dinner on the table with minimal fuss. These sliders are not only incredibly tasty but also incredibly versatile, making them a fantastic addition to your regular meal rotation.
Ingredients
Instructions
1. Prepare the Chicken and Instant Pot: Place the boneless, skinless chicken breasts or thighs at the bottom of your Instant Pot insert.
2. Mix the Sauce: In a medium bowl, whisk together 3/4 cup of the barbecue sauce, chicken broth, apple cider vinegar, garlic powder, onion powder, and black pepper until well combined.
3. Add Sauce to Pot: Pour the sauce mixture evenly over the chicken in the Instant Pot. Ensure the chicken is mostly submerged in the liquid.
4. Pressure Cook the Chicken: Secure the lid on the Instant Pot and make sure the vent is set to the “Sealing” position. Select the “Manual” or “Pressure Cook” setting and set the cooking time to 15 minutes on high pressure.
5. Release Pressure and Shred: Once the cooking cycle is complete, allow for a natural pressure release for 5 minutes, then carefully switch the vent to “Venting” for a quick release of any remaining pressure. Open the lid, remove the chicken to a large bowl, and shred it using two forks. It should be very tender and easy to shred.
6. Combine with Remaining Sauce: Return the shredded chicken to the Instant Pot with the remaining sauce, or transfer it back to the bowl. Stir in the remaining 1/4 cup of barbecue sauce until the chicken is thoroughly coated and heated through.
7. Prepare the Buns (Optional): While the chicken is cooking, preheat your oven to 350 F (175 C). Arrange the slider buns on a baking sheet. Brush the tops with melted butter and sprinkle with sesame seeds, if desired. Bake for 3-5 minutes, or until lightly golden and warmed.
8. Assemble and Serve: Spoon the warm BBQ chicken mixture onto the prepared slider buns. Serve immediately with your favorite sides.
- Prep Time: 10 minutes
- Cook Time: 15 minutes
- Category: main dish
- Method: pressure cooking
- Cuisine: american
Nutrition
- Serving Size: 1 slider
Keywords: bbq chicken, sliders, instant pot, chicken, barbecue, easy, weeknight, dinner, pressure cooker, family meal
What You’ll Love About This Quick And Easy Recipe
This Instant Pot BBQ Chicken Sliders recipe is a true lifesaver for anyone juggling a busy schedule but still wanting to serve a homemade, flavorful meal. It’s perfect for families, busy professionals, or anyone looking for a delicious dinner solution that doesn’t require hours in the kitchen. The Instant Pot does most of the heavy lifting, transforming simple ingredients into tender, saucy BBQ chicken in a fraction of the time it would take using traditional methods. You’ll love how quickly the chicken cooks to shreddable perfection, making assembly a breeze. These sliders are ideal for a casual weeknight dinner, a relaxed weekend lunch, or even a potluck contribution that’s sure to be a hit. It’s a comforting, crowd-pleasing dish that delivers big on flavor without the stress.
Everything You Need To Make This Recipe Without Stress
Making these Instant Pot BBQ Chicken Sliders requires just a few readily available ingredients. You likely have many of these staples in your pantry already, which makes whipping up this meal even easier. We’re focusing on simplicity and deliciousness, so no fancy or hard-to-find items are needed.
INGREDIENTS:

- 1.5 pounds boneless, skinless chicken breasts or thighs
- 1 cup barbecue sauce, divided
- 1/2 cup chicken broth
- 1 tablespoon apple cider vinegar
- 1 teaspoon garlic powder
- 1/2 teaspoon onion powder
- 1/4 teaspoon black pepper
- 12 slider buns or small dinner rolls
- 2 tablespoons unsalted butter, melted
- Optional: 1 tablespoon sesame seeds
- Optional: Coleslaw for serving
When selecting your ingredients, feel free to use your favorite brand of barbecue sauce – whether it’s sweet, smoky, or spicy, it will work wonderfully here. For the chicken, a mix of breasts and thighs can add extra flavor and moisture, though all breasts or all thighs work perfectly fine too. If you don’t have apple cider vinegar, white vinegar can be used in a pinch, but apple cider vinegar adds a nice subtle tang. As for the slider buns, any small dinner roll or Hawaiian sweet roll will be delicious.
Time Needed From Start To Finish
One of the best features of this Instant Pot BBQ Chicken Sliders recipe is its incredible efficiency. From the moment you start prepping to the moment you take your first bite, you’re looking at a very reasonable timeframe, making it ideal for those evenings when time is of the essence.
- Prep Time: 10 minutes
- Cook Time: 15 minutes (plus pressure build-up and release time)
- Total Time: 30-35 minutes
The Instant Pot significantly cuts down on cooking time, allowing the chicken to become incredibly tender and flavorful in a fraction of the time it would take in a slow cooker or oven. The quick prep involves simply gathering and combining ingredients, making this a truly “set it and forget it” kind of meal until it’s time to shred the chicken.
How To Make It Step By Step With Visual Cues

Making these Instant Pot BBQ Chicken Sliders is incredibly straightforward. Follow these simple steps for perfectly tender, saucy chicken every time.
- Prepare the Chicken and Instant Pot: Place the boneless, skinless chicken breasts or thighs at the bottom of your Instant Pot insert.
- Mix the Sauce: In a medium bowl, whisk together 3/4 cup of the barbecue sauce, chicken broth, apple cider vinegar, garlic powder, onion powder, and black pepper until well combined.
- Add Sauce to Pot: Pour the sauce mixture evenly over the chicken in the Instant Pot. Ensure the chicken is mostly submerged in the liquid.
- Pressure Cook the Chicken: Secure the lid on the Instant Pot and make sure the vent is set to the “Sealing” position. Select the “Manual” or “Pressure Cook” setting and set the cooking time to 15 minutes on high pressure.
- Release Pressure and Shred: Once the cooking cycle is complete, allow for a natural pressure release for 5 minutes, then carefully switch the vent to “Venting” for a quick release of any remaining pressure. Open the lid, remove the chicken to a large bowl, and shred it using two forks. It should be very tender and easy to shred.
- Combine with Remaining Sauce: Return the shredded chicken to the Instant Pot with the remaining sauce, or transfer it back to the bowl. Stir in the remaining 1/4 cup of barbecue sauce until the chicken is thoroughly coated and heated through.
- Prepare the Buns (Optional): While the chicken is cooking, preheat your oven to 350°F (175°C). Arrange the slider buns on a baking sheet. Brush the tops with melted butter and sprinkle with sesame seeds, if desired. Bake for 3-5 minutes, or until lightly golden and warmed.
- Assemble and Serve: Spoon the warm BBQ chicken mixture onto the prepared slider buns. Serve immediately with your favorite sides.
Easy Variations And Serving Ideas That Fit Real Life
These Instant Pot BBQ Chicken Sliders are incredibly versatile, making them perfect for adapting to different tastes and occasions. For a kid-friendly twist, you can opt for a milder, sweeter barbecue sauce and serve with a side of apple slices or carrot sticks. If you have picky eaters, you might even serve the shredded chicken and buns separately, allowing them to assemble their own.
For a bit of a kick, consider adding a pinch of cayenne pepper or a dash of hot sauce to the BBQ mixture before cooking. You could also stir in some finely diced jalapeños with the sauce for a subtle heat. For a smoky flavor, a few drops of liquid smoke can be added to the sauce.
Serving these sliders is half the fun! They are fantastic on their own, but pairing them with simple sides elevates the meal. Classic coleslaw is a perfect complement, offering a cool, creamy crunch that contrasts beautifully with the warm, savory chicken. Other great side dishes include potato salad, corn on the cob, a simple green salad, or even some baked beans. For a party or buffet, arrange the sliders on a large platter and offer a variety of toppings like sliced pickles, red onion rings, or extra barbecue sauce on the side, allowing guests to customize their own.
Common Slip-Ups And How To Avoid Them
Even with a straightforward recipe like Instant Pot BBQ Chicken Sliders, a few common mistakes can impact the final outcome. Being aware of these can help ensure your meal is a success every time.
One common slip-up is not adding enough liquid to the Instant Pot. The Instant Pot requires a minimum amount of liquid to come to pressure safely and cook properly. For this recipe, the combination of chicken broth and barbecue sauce provides ample liquid. Always ensure you have at least 1 cup of liquid in the pot before sealing.
Another mistake can be overcooking the chicken. While the Instant Pot is forgiving, cooking chicken for too long can still result in a slightly dry texture. For boneless, skinless chicken breasts, 15 minutes on high pressure with a 5-minute natural release is generally perfect for shreddable, moist chicken. If using thicker chicken thighs, this time is also usually sufficient, but you can add a minute or two if your thighs are particularly large.
Forgetting to shred the chicken properly before mixing with the remaining sauce can also lead to a less cohesive slider filling. Make sure to shred the chicken thoroughly with two forks; it should be very tender and pull apart easily. This ensures every bite of your slider is packed with flavor and has a pleasant texture.
Finally, not warming the buns can detract from the experience. While not strictly necessary, lightly toasting or warming the slider buns in the oven with a brush of melted butter makes a significant difference in taste and texture, providing a soft yet slightly crisp foundation for your delicious BBQ chicken.
How To Store It And Make It Ahead Without Ruining Texture
These Instant Pot BBQ Chicken Sliders are fantastic for meal prep and make-ahead options, allowing you to enjoy delicious, quick meals even on your busiest days. Proper storage ensures the chicken remains flavorful and moist.
To store leftover BBQ chicken, transfer the shredded chicken mixture to an airtight container. It will keep well in the refrigerator for up to 3-4 days. For longer storage, the cooked BBQ chicken can be frozen. Place it in a freezer-safe bag or container and freeze for up to 2-3 months. Thaw overnight in the refrigerator before reheating.
When reheating, the best method depends on whether it’s frozen or just refrigerated. For refrigerated chicken, you can gently warm it in a saucepan over medium-low heat on the stovetop, stirring occasionally, until heated through. You can also microwave individual portions in 30-second intervals, stirring in between, until warm. If reheating from frozen, thaw first, then use the stovetop or microwave method. Avoid overheating, as this can dry out the chicken

FAQs
- Can I make these ahead? Yes—prep ahead, refrigerate, then serve when ready.
- How long do leftovers last? Store covered in the fridge for 3–4 days for best texture.
- Can I adjust sweetness? Yes—add more or less sweetener to taste.
- Can I change the fruit? Yes—swap strawberries for blueberries, raspberries, or sliced banana.